Card Making Without Dies: How to Cut Printable Sentiments Neatly
You don't need sentiment dies or stamps to make beautiful greeting cards. Printable sentiments are a lovely alternative, especially if you enjoy choosing your own messages, colors, and styles.
Of course, die-cut sentiments have that neat, polished look, and stamped sentiments can look beautiful too. But stamps sometimes need a little extra care to get an even impression, and fixing a sentiment that hasn't stamped properly can be a bother.
With printables, you simply choose the sentiment you like, print it, and cut it out. The only tricky part is getting the cutting right. The good news is that you don't need any special equipment to do that. I use scissors and a craft knife most often, but there are other tools that can make the job easier, depending on the shape of your sentiment and the look you want.
Let's look at how to cut printable sentiments neatly using tools you may already have at home.


Start With a Good Print
Neat cutting starts before you even pick up your scissors. The paper you use makes a difference, too. I recommend printing sentiments on cardstock rather than regular copy paper whenever your printer allows it. I usually use cardstock weighing around 80–90 lb (220–250 gsm). It holds its shape better while you're cutting, and the finished sentiment feels sturdy enough to handle when you're gluing it onto a card.
It's also worth checking that your printer has finished printing cleanly before you start cutting. My Epson L8180 prints beautifully, so I can usually cut my sentiments straight away. If your printer needs a little more time for the ink to dry, let it sit for a few minutes first to avoid smudging.
If your printer doesn't handle thicker paper well, you can print on regular paper and glue the sentiment onto cardstock before cutting it out. It's an easy alternative when you want a little more stability. If you're new to printing your own card-making supplies, you might also find my guide Card Making Printables for Beginners: A Practical Guide to Printing at Home helpful.


How to Cut Printable Sentiments Neatly With Scissors
Scissors are one of the simplest tools for cutting printable sentiments, and they're the ones I reach for most often when making cards. You don't need a special pair, although having scissors in different sizes can be useful. Smaller scissors are handy when you're working around lettering or cutting small shapes, while larger ones are comfortable for cutting bigger pieces of paper.
Here are a few things that help me get neater results.
Cut a rough shape first. Instead of trying to cut a sentiment out of a whole sheet, cut around it roughly to separate it from the other sentiments. It's much easier to handle a smaller piece of paper when you're working on the final cut.
Use long, smooth cuts whenever possible. Try to cut with the middle part of the blades rather than just the tips. A series of tiny snips can leave a wobbly edge, while longer, smoother cuts usually look neater.
Turn the paper as you cut. When you're cutting around a sentiment, move the paper to follow the shape instead of constantly changing the position of your scissors. This is especially helpful around corners and curves.
Keep your scissors for paper. Scissors that are also used for ribbon, tape, or other materials can become dull or sticky. Keeping a pair just for paper helps them stay in better condition.
And if you like decorative edges, patterned scissors are another option. They can give your sentiment a scalloped or zigzag border without any additional tools. Just make sure the pattern complements the style of the sentiment and the card you're making.


Cutting Straight Lines With a Craft Knife and Ruler
When I need a straight edge, especially around rectangular sentiments, I often use a craft knife and a ruler. This method takes a little more care than cutting with scissors, but it gives you good control over where the cut goes. I find this method particularly useful when I want a straight edge but don't want to get out any larger equipment.
Use a metal ruler. A metal ruler is a better choice than a plastic one when cutting with a craft knife. A blade can damage the edge of a plastic ruler, making it less reliable for future cuts.
Work on a cutting mat. A cutting mat protects your work surface and provides a suitable base for cutting. I have a glass top on my white worktable, so I cut directly on it with my craft knife. It doesn't show any marks afterward, which is one of the things I like about it. I also have the usual green cutting mat, but I don't use it very often.
Position the ruler carefully. Line up the ruler with the edge you want to cut. Check that the sentiment is positioned correctly before you start, particularly if you're keeping a printed border around the words.
Make several light passes. Rather than pressing hard to cut through the cardstock in one go, make a few gentle passes along the ruler. This gives you more control and helps prevent the paper from tearing.
Check your blade. A dull blade can drag against the paper and leave a rough edge. If you notice that your cuts are no longer clean, it may be time to replace it.


Is a Paper Trimmer Worth Using for Sentiment Strips?
If you make lots of cards with narrow, rectangular sentiments, a paper trimmer might be a convenient option. I don't usually use one for cutting my sentiments, as I prefer scissors and a craft knife, but I can see why a trimmer would appeal to someone who cuts a lot of strips.
The main advantage is that it helps you make straight cuts quickly, especially when several sentiments have parallel edges. If you decide to use one, here are a few things to keep in mind.
Align the printed guides carefully. If your printable includes straight cutting lines, use them to position the paper rather than assuming the edge of the sheet is perfectly straight.
Keep the paper from shifting. Hold it firmly in place while cutting so the line doesn't move.
Use a clean, sharp blade. A worn blade may leave rough edges instead of cutting cleanly through the paper.
Test it on a spare print first. This gives you a chance to check the alignment and see how much of the printed border will remain.
A paper trimmer isn't essential for printable sentiments, but it can be a useful addition to your craft supplies if straight cuts are something you make frequently.


How to Cut Circular Sentiments With Scissors
Round sentiments can be a little trickier to cut by hand, I admit. But with a little practice, you can get a nice, smooth circle without needing a special tool.
Turn the paper, not the scissors. This is the tip I find most helpful. Keep your scissors in a comfortable position and slowly rotate the paper as you cut around the circle. It makes following the curve much easier.
Don't rush the curve. Make small, controlled movements as you follow the outline. Trying to get around the whole circle too quickly can leave flat spots or an uneven edge.
Use a compass if you need to draw your own circle. If your sentiment isn't already printed inside a circular shape, you can use a compass to draw a circle around it. Make sure there's enough space between the lettering and the outline, then cut along the line.
If you prefer a white border around your sentiment, leave a little extra space when drawing the circle. You can always trim it closer afterward if you want a different look. If you'd like to see how circular sentiments look on finished cards, take a look at 3 Handmade Card Ideas Using Printable Circular Sentiments.


The Quickest Way to Cut Circles: A Circle Punch
If you use circular sentiments regularly, a circle punch can save you time and give you consistent results. Unlike cutting a circle by hand, a punch cuts the same shape each time, which is particularly useful if you're making several cards with matching sentiments.
Check the size before you punch. The punch needs to be large enough to fit around the printed sentiment. If it's too small, it will cut into the lettering or remove part of the border.
Turn the punch upside down, if your punch allows it. Many circle punches let you see the cutting area from underneath. This makes it easier to position the sentiment exactly where you want it before pressing the punch.
What if your sentiment is too large? You might be able to print it at a smaller size so it fits your punch. However, you'll probably need to experiment with the print settings and make a few test prints before you get the size right.
Whether that's worth the extra time and paper depends on how many sentiments you need and how often you'll use that size. If you only need one or two, cutting them by hand might be simpler. You can also experiment with other shape punches if your sentiments don't have a printed border. A heart or hexagon, for example, might work nicely with certain designs, as long as the shape doesn't cut into the lettering.


Should You Keep the Border or Cut Close to the Words?
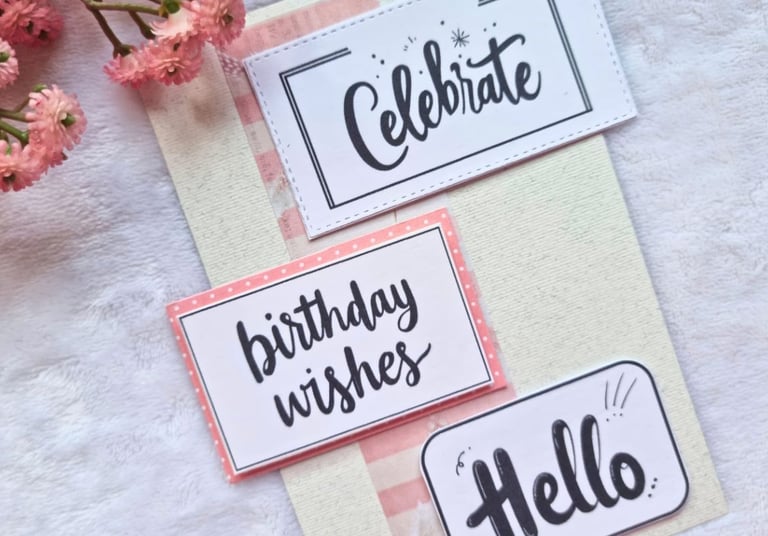
This is a choice I make on almost every card, and I almost always prefer to keep the border. But that's just me. I like the way that thin printed line gives the sentiment a little frame of its own. Keeping the border is also more forgiving when you're cutting by hand. You simply cut along the outside of the line, and if your cut wanders a tiny bit, the line still looks neat and even.
Cutting the border off gives you a softer, cleaner look. You still keep the white around the words, you just trim the printed line away. Without the frame, the sentiment feels lighter on the card, and it's a lovely choice when you plan to mat it on colored card stock, because the mat becomes the frame instead. On the "Hello Lovely" sentiments in the photo, you can see how different the same words look with the line and without it.
Neither option is better than the other. It comes down to the look you're after and how you want the sentiment to sit on your card. If you're unsure, try both with the same printable. You might be surprised by how different the finished sentiments look.
I've also shared nine other ways to use printed sentiments in Ways to Add Sentiments to Your Cards.
You Don't Need Special Dies to Make Beautiful Sentiments
Cutting printable sentiments neatly doesn't require a collection of expensive tools. Scissors and a craft knife are enough for most of the sentiments I use on my cards, while a circle punch can be handy if you often work with round designs.
The trick is to choose the cutting method that suits the shape and style of your sentiment, take your time, and remember that a little border or an extra layer can make a big difference to the finished look.
And don't worry if your cuts aren't always perfect. Handmade cards don't have to look machine-made to be beautiful.
With a few printable sentiments and the tools you already have, you can create plenty of lovely cards without sentiment dies or stamps.
And if you’d like plenty of sentiments to practice on, The Sentiments Vault has all my printable sets in one collection, from boxed and script sentiments to strips and circles. Print as many as you like, and cut them whichever way suits your card.